| 일 | 월 | 화 | 수 | 목 | 금 | 토 |
|---|---|---|---|---|---|---|
| 1 | 2 | 3 | 4 | 5 | 6 | 7 |
| 8 | 9 | 10 | 11 | 12 | 13 | 14 |
| 15 | 16 | 17 | 18 | 19 | 20 | 21 |
| 22 | 23 | 24 | 25 | 26 | 27 | 28 |
- CS285
- machine learning
- BFS
- hm3d
- RL
- 딥러닝
- ubuntu
- 그래프 이론
- 강화학습
- r-cnn
- Reinforcement Learning
- GIT
- Python
- AlexNet
- deep learning
- dfs
- 백준
- image processing
- YoLO
- 머신러닝
- hm3dsem
- MySQL
- dynamic programming
- LSTM
- C++
- opencv
- NLP
- UC Berkeley
- DP
- CNN
- Today
- Total
JINWOOJUNG
[YOLO 11] Real Time Object Detection 본문
몇개월 전 Yolo8 Model을 학습시키기 위한 Custom Dataset 구축 및 학습에 관한 포스팅을 진행하였다. 학습된 모델을 기반으로 실시간 객체 검출에 관한 포스팅을 이어나갈려고 하였는데, 그 짧은 기간동안 Yolo11이 출시되어 해당 모델을 기반으로 진행하겠다. Yolo11 논문에 대한 분석은 추후 진행할 예정이다.
https://jinwoo-jung.tistory.com/69
[ YOLOv8 ] Custom Dataset 학습(Google Colab)
https://jinwoo-jung.tistory.com/68 [ YOLOv8 ] Custom Dataset 구축(Roboflow)YOLOv8을 통한 Object Detection을 위해선 적합한 Model을 생성해야 한다.Model 학습을 위해선 Custom Dataset을 구축해야 하며, YOLOv8의 경우 Roboflow
jinwoo-jung.com
0. 개발 환경
OS : Ubuntu 20.04
GPU : GeForce RTX 3070
cuda version: 12.1
torch version : 2.3.0+cu121
webcam : USB Logitech Webcam
1. Real Time Object Detection
USB Webcam 으로부터 입력받은 영상 정보를 활용하여 Real Time Object Detection을 수행한다.
results =  self.model(img)

for result in results:
    for box in result.boxes:
        # GPU 상의 Tensor 객체 -> CPU -> numpy.ndarray
        x1, y1, x2, y2 = box.xyxy[0].cpu().numpy()  # BBox Coordinate

        # Confidence - box.conf[0] : PyTorch Scalar -> Python Scalar
        conf = box.conf[0].item()  # Confidence
        cls = box.cls[0].item()  # Class ID
        class_name = self.model.names[int(cls)]  # Class Name

        # BBox와 Text 그리기
        cv2.rectangle(img, (int(x1), int(y1)), (int(x2), int(y2)), (0, 0, 255), 3)
        cv2.putText(
            img,
            f"{class_name} {conf:.2f}",
            (int(x1), int(y1) - 10),
            cv2.FONT_HERSHEY_SIMPLEX,
            0.5,
            (0, 0, 255),
            3,
        )
객체 검출 결과인 results은 ultralytics.engine.results.Results Class이다. 이에 대한 정확한 정보는 공식 문서에서 확인할 수 있다.

실제로 results를 출력 해 보면 해당 정보를 모두 확인할 수 있다. 그 중, 몇가지를 살펴보자.

results.names를 출력하면 다음과 같다. 해당 Model이 학습한 전체 Class 정보를 확인할 수 있다.
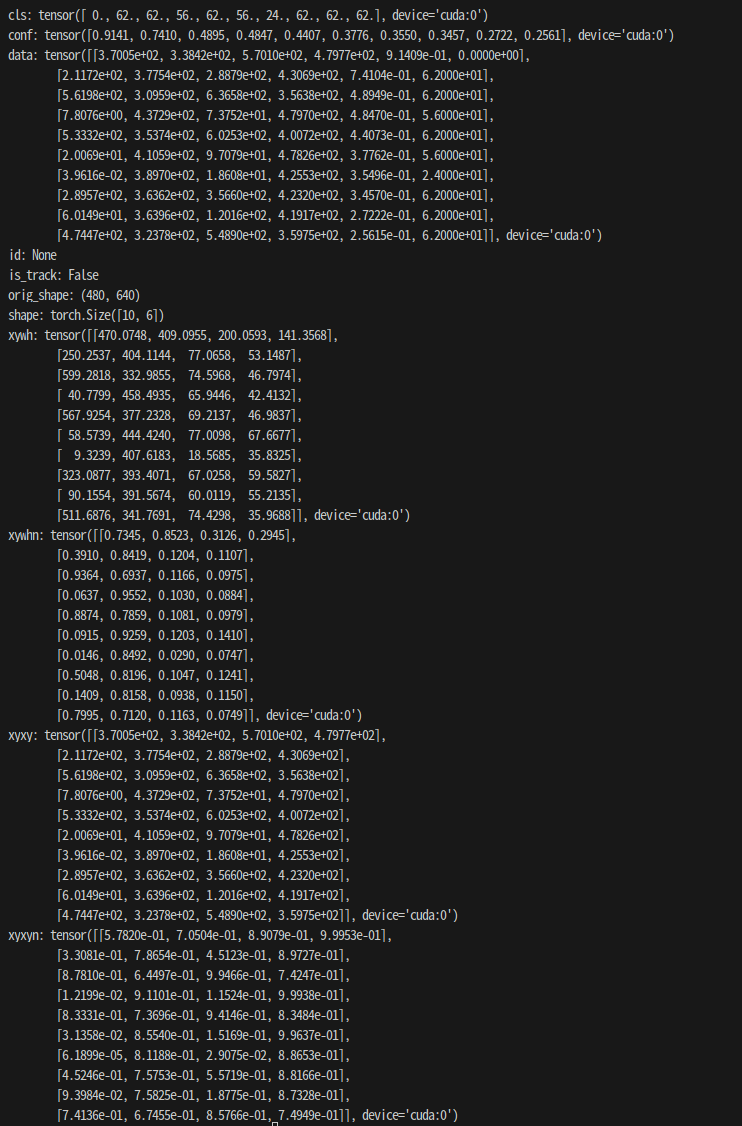
검출한 각각의 객체 정보는 results.boxes로 접근하게 된다. 이는 ultralytics.engine.results.Boxes Class를 가진다.

공식 문서에서 boxes에 담긴 Attribute를 살펴보면 다음과 같다. 이는 Tensor 객체로 구성되어 있으며, xyxy는 BBox의 좌표, cls는 Class, conf는 신뢰도를 나타냄을 확인할 수 있다.

실제로 해당 정보를 출력 해 보면 위와 같다. 각각은 Tensor 객체로 구성되어 있으며 각각의 검출 결과를 Index를 활용해서 접근해야 한다.
for result in results:
    for box in result.boxes:
        # GPU 상의 Tensor 객체 -> CPU -> numpy.ndarray
        x1, y1, x2, y2 = box.xyxy[0].cpu().numpy()  # BBox Coordinate

        # Confidence - box.conf[0] : PyTorch Scalar -> Python Scalar
        conf = box.conf[0].item()  # Confidence
        cls = box.cls[0].item()  # Class ID
        class_name = self.model.names[int(cls)]  # Class Name

        # BBox와 Text 그리기
        cv2.rectangle(img, (int(x1), int(y1)), (int(x2), int(y2)), (0, 0, 255), 3)
        cv2.putText(
            img,
            f"{class_name} {conf:.2f}",
            (int(x1), int(y1) - 10),
            cv2.FONT_HERSHEY_SIMPLEX,
            0.5,
            (0, 0, 255),
            3,
        )
실제로 구현 과정에서는 for box in result.boxes로 하나하나 받아와 값들을 접근했기 때문에 [0]로 접근함을 확인할 수 있다. 이때, 각각의 정보는 전부 GPU 상의 Tensor 객체임을 확인할 수 있다. 따라서 torch.item Method를 활용해 PyTorch Scalar에서 Python Scalar로 변형시킴을 확인할 수 있다. 또한, box.xyxy[0]는 GPU 상에 존재하기에 torch.numpy()를 사용할 수 없다. 따라서 torch.cpu()를 통해 CPU로 가져온 뒤, torch.numpy Method를 사용해서 Numpy Array로 변형시킨 뒤 각각의 값을 가져옴을 확인할 수 있다.
2. Whole Code
전체적인 코드는 다음과 같다.
import cv2
import time
from ultralytics import YOLO

class YOLODetector:
    def __init__(self):
        """
        YOLODetector 초기화
        :model_path: YOLO 모델 경로
        :webcam_index: 웹캠 인덱스
        """
        self.model_path = ("yolo11m.pt")
        self.webcam_idx = 0

        self.model = YOLO(self.model_path)
        self.cap = cv2.VideoCapture(self.webcam_idx)

        if not self.cap.isOpened():
            raise ValueError("웹캠이 연결되지 않았습니다.")

        self.t_prev = 0

    def run(self):
        while True:
            ret, frame = self.cap.read()
            if not ret:
                print("Frame을 읽을 수 없습니다.")
                break

            img = frame.copy()

            results =  self.model(img)

            for result in results:
                for box in result.boxes:
                    x1, y1, x2, y2 = box.xyxy[0].cpu().numpy()  # BBox Coordinate

                    conf = box.conf[0].item()  # Confidence
                    cls = box.cls[0].item()  # Class ID
                    class_name = self.model.names[int(cls)]  # Class Name

                    cv2.rectangle(img, (int(x1), int(y1)), (int(x2), int(y2)), (0, 0, 255), 3)
                    cv2.putText(
                        img,
                        f"{class_name} {conf:.2f}",
                        (int(x1), int(y1) - 10),
                        cv2.FONT_HERSHEY_SIMPLEX,
                        0.5,
                        (0, 0, 255),
                        3,
                    )

            # 시각화
            cv2.imshow("YOLO Detection", img)
            cv2.imshow("Raw Image", frame)

            # 'q' 키를 누르면 종료
            if cv2.waitKey(1) & 0xFF == ord('q'):
                break

        self.cap.release()
        cv2.destroyAllWindows()

if __name__ == "__main__":
    detector = YOLODetector()
    detector.run()
만약 정상동작하지 않으면 몇가지 환경적 차이가 있을 수 있다.
- Model Path
- Ultralytics
- USB Webcam의 webcam index
이 외 문제가 지속되면 추후 확인이 필요할 것 같다.
'딥러닝' 카테고리의 다른 글
| [ YOLOv8 ] 학습된 모델 성능 분석(Confusion Matrix, Precision, Recall, Confidence, NMS) (0) | 2024.08.18 |
|---|---|
| [ YOLOv8 ] Custom Dataset 학습(Google Colab) (4) | 2024.05.07 |
| [ YOLOv8 ] Custom Dataset 구축(Roboflow) (0) | 2024.05.07 |


