| 일 | 월 | 화 | 수 | 목 | 금 | 토 |
|---|---|---|---|---|---|---|
| 1 | 2 | 3 | ||||
| 4 | 5 | 6 | 7 | 8 | 9 | 10 |
| 11 | 12 | 13 | 14 | 15 | 16 | 17 |
| 18 | 19 | 20 | 21 | 22 | 23 | 24 |
| 25 | 26 | 27 | 28 | 29 | 30 | 31 |
- ubuntu
- real-time object detection
- 백준
- GIT
- machine learning
- LSTM
- image processing
- RL
- 그래프 이론
- opencv
- YoLO
- C++
- 강화학습
- dynamic programming
- AlexNet
- r-cnn
- deep learning
- Reinforcement Learning
- NLP
- hm3dsem
- MySQL
- dfs
- eecs 498
- BFS
- hm3d
- CNN
- 머신러닝
- DP
- Python
- 딥러닝
- Today
- Total
JINWOOJUNG
[EECS 498] Assignment 1. PyTorch 101...(3) 본문
본 포스팅은 Michigan Univ.의 EECS 498 강의를 수강하면서 공부한 내용을 정리하는 포스팅입니다.
[EECS 498] Assignment 1. PyTorch 101...(2)
본 포스팅은 Michigan Univ.의 EECS 498 강의를 수강하면서 공부한 내용을 정리하는 포스팅입니다.https://jinwoo-jung.tistory.com/118 [EECS 498] Assignment 1. PyTorch 101...(1)본 포스팅은 Michigan Univ.의 EECS 498 강의를
jinwoo-jung.com
12. Matrix operations
torch.dot(input, tensor, *, out=None) → Tensor

v = torch.tensor([9,10], dtype=torch.float32)
w = torch.tensor([11, 12], dtype=torch.float32)
print(torch.dot(v, w))
print(v.dot(w))
# tensor(219.)
# tensor(219.)

torch.mm(input, mat2, *, out=None) → Tensor

x = torch.tensor([[1,2],[3,4]], dtype=torch.float32)
y = torch.tensor([[5,6],[7,8]], dtype=torch.float32)
print(torch.mm(x, y))
print(x.mm(y))
# tensor([[19., 22.],
#         [43., 50.]])
# tensor([[19., 22.],
#         [43., 50.]])
Rank가 1인 두 Vector Tensor 객체의 dot product(내적)은 torch.dot을 통해 계산 가능하다.
Rank가 2 이상인 두 Matrix Tensor 객체의 Matrix product은 torch.mm을 통해 계산 가능하다.
v = torch.tensor([9,10], dtype=torch.float32)
# tensor([ 9., 10.])
x = torch.tensor([[1,2],[3,4]], dtype=torch.float32)
# tensor([[1., 2.],
#         [3., 4.]])

torch.mv(input, vec, *, out=None) → Tensor

print(torch.mv(x, v))               # tensor([29., 67.])
print(x.mv(v))                      # tensor([29., 67.])
print(x.mv(v).shape)                # torch.Size([2])

print(torch.mm(x, v.view(2, 1)))
print(x.mm(v.view(2, 1)))
print(x.mm(v.view(2, 1)).shape)
# tensor([[29.],
        # [67.]])
# torch.Size([2, 1])

torch.matmul(input, other, *, out=None) → Tensor

print(torch.matmul(x, v))          # tensor([29., 67.])
print(x.matmul(v))                 # tensor([29., 67.])
print(x.matmul(v).shape)           # torch.Size([2])
vector와 matrix의 곱을 할 수 있는 방법은 3가지가 존재하며, 각각의 Output Tensor의 Rank가 달라진다.
먼저 torch.mv를 기반으로 Matrix와 Vector Tensor의 곱셈을 수행한다. 이때, 반환되는 Tensor는 Rank가 1이 된다.
다음으로 Vector를 torch.view를 통해 Rank가 2가 되도록 변형시키고, 두 Matrix의 곱이 가능하도록 Size를 설정한 뒤 torch.mm을 이용하는 방법이다. 이때, Output Tensor의 Rank는 2가 된다.
마지막으로 torch.matmul을 사용하는 방법이다. 이때, 반환되는 Tensor는 Rank가 1이 된다.
torch.stack(tensors, dim=0, *, out=None) → Tensor

def batched_matrix_multiply_loop(x: Tensor, y: Tensor) -> Tensor:

    z_list = []

    # Depth가 동일하므로 각 층에서의 Matrix Product 진행
    for dim_0 in range(x.shape[0]):
        z_list.append(x[dim_0].mm(y[dim_0]))

    # 0 Dimension으로 각 층에서의 Matrix Product 결과를 쌓음
    z = torch.stack(z_list, dim=0)

    return z

torch.bmm(input, mat2, *, out=None) → Tensor

def batched_matrix_multiply_noloop(x: Tensor, y: Tensor) -> Tensor:

    z = x.bmm(y)

    return z
A Tensor는 QxWxE, B Tensor는 QxExR의 크기를 가진다고 하자. 우리는 두 Tensor의 곱은 QxWxR이 된다는 것을 자연스럽게 유추할 수 있다. 이러한 연산이 가능하게 하는 것이 batched_matrix_multiply_loop, batched_matrix_multiply_noloop이다.
이 연산은 Depth(Batch Size)가 동일하기 때문에, 각 층에서의 Matrix 연산으로 계산할 수 있다. 따라서 dim=0에 대하여 for 문을 돌면서 해당 층의 두 Matrix Product를 torch.mm으로 수행한 뒤, 전체 층에 대한 결과를 torch.stack으로 dim=0에 대하여 쌓을 수 있다.
Loop가 존재하면 Size가 커질수록 그 연산 속도는 기하급수적으로 늘어난다. 따라서 이를 구현 해 놓은 것이 torch.bmm이다. 이는, Batch Matrix Multiplication을 수행하는 함수로 동일한 결과를 반환한다.
13. Broadcasting
x = torch.tensor([[1,2,3], [4,5,6], [7,8,9], [10, 11, 12]])
v = torch.tensor([1, 0, 1])
y = x + v
print(y)

# tensor([[ 2,  2,  4],
#         [ 5,  5,  7],
#         [ 8,  8, 10],
#         [11, 11, 13]])
두 Tensor의 Size가 맞지 않기 때문에 연산이 실행될 수 없지만, 우리는 x Tensor의 각 행에 대하여 모두 v Tensor를 더한 결과를 기대한다. 이때 사용되는 것이 Broadcasting인데, 자동으로 더 작은 크기의 array가 더 큰 크기의 array로 자연스럽게 Broadcasting 되어 연산이 수행됨을 의미한다.
x = torch.tensor([[1, 2, 3], [4, 5, 6], [7, 8, 9], [10, 11, 12]])
v = torch.tensor([1, 0, 1])

print('Here is x (before broadcasting):')
# tensor([[ 1,  2,  3],
        # [ 4,  5,  6],
        # [ 7,  8,  9],
        # [10, 11, 12]])
# x.shape:  torch.Size([4, 3])

print('\nHere is v (before broadcasting):')
# tensor([1, 0, 1])
# v.shape:  torch.Size([3])

torch.broadcast_tensors(*tensors) → List of Tensors

xx, vv = torch.broadcast_tensors(x, v)
print('Here is xx (after) broadcasting):')
# tensor([[ 1,  2,  3],
#         [ 4,  5,  6],
#         [ 7,  8,  9],
#         [10, 11, 12]])
# xx.shape:  torch.Size([4, 3])
print('\nHere is vv (after broadcasting):')
# tensor([[1, 0, 1],
#         [1, 0, 1],
#         [1, 0, 1],
#         [1, 0, 1]])
# vv.shape:  torch.Size([4, 3])
Broadcasting은 암시적으로 수행되지만, 명시적으로 수행하고 싶으면 torch.bradcast_tensors를 활용할 수 있다. Broadcasting 결과 v는 x의 size에 맞게 변형되어 vv가 생성됨을 확인할 수 있다. 따라서, 두 Matrix의 크기가 동일함으로 연산이 가능하다.
# 외적
v = torch.tensor([1, 2, 3])
w = torch.tensor([4, 5])

print(v.view(3, 1) * w)
# tensor([[ 4,  5],
        # [ 8, 10],
        # [12, 15]])


# Matrix Vector 덧셈
x = torch.tensor([[1, 2, 3], [4, 5, 6]])
v = torch.tensor([1, 2, 3])

print(x + v)
# tensor([[2, 4, 6],
#         [5, 7, 9]])

x = torch.tensor([[1, 2, 3], [4, 5, 6]])
w = torch.tensor([4, 5])

print(x + w.view(-1, 1))
# tensor([[ 5,  6,  7],
#         [ 9, 10, 11]])
Broadcasting은 손쉽게 Vector와 Matrix의 연산을 가능하게 한다.
외적 계산 시 3x1 Shape으로 v를 변형시킨 뒤 vector w를 곱한다. v는 Rank가 1이지만, 1x2 Shape를 가지는 것 처럼 Broadcasting되어 처리된다.
또한, 마지막 x의 경우 2x3의 Shape를 가지는데, w를 2x1로 변형시킨 뒤 단순히 더하면 w가 각각의 열으로 x에 Broadcasting되어되어 처리된다.
def normalize_columns(x: Tensor) -> Tensor:

    # Column 별로 정규화를 위한 평균 계산
    column_means = x.sum(dim=0) / x.shape[0]

    # Column 별로 정규화를 위한 표준편차 계산
    column_variances = torch.sqrt(((x - column_means) ** 2).sum(dim=0) / (x.shape[0]-1))

    # Normalization
    y = (x - column_means) / column_variances

    return y
normalize_columns는 입력 Tensor에 대하여 Column 별로 정규화를 진행하는 함수이다. 먼저 평균을 위해 dim=0로 torch.sum을 이용해 합을 구한 뒤, 행의 개수인 x.shape[0]로 나눠준다. 표준편차 역시 공식에 기반하여 계산하며, 최종적으로 정규화를 위해 각 원소 값에서 편균을 뺀 뒤 표준편차로 나눠주었다.

14. Out-of-place vs in-place operators
Out-of-place는 원본 Tensor를 수정하지 않고, 새로운 Tensor를 생성하여 결과를 저장하는 방식이다. 반면, In-place의 경우 연산 결과를 원래의 텐서에 저장하여 원본 텐서를 직접 수정하는 방식이다.
x = torch.tensor([1, 2, 3])
y = torch.tensor([3, 4, 5])
z = x.add(y)
# x:  tensor([1, 2, 3])
# y:  tensor([3, 4, 5])
# z:  tensor([4, 6, 8])

x.add_(y)
# x:  tensor([4, 6, 8])
# y:  tensor([3, 4, 5])
# z:  tensor([4, 6, 8])
z = x.add(y)는 Out-of-place 연산으로, x+y의 결과가 새로운 Tensor를 생성하여 z에 할당한다. 하지만, x.add_(y)는 In-place로 입력 Tensor인 x 자체가 변경된 것을 확인할 수 있다.
15. Running on GPU
x0 = torch.tensor([[1, 2], [3, 4]], dtype=torch.float32)
# x0 device: cpu

x1 = x0.to('cuda')
# x1 device: cuda:0

x2 = x0.cuda()
# x2 device: cuda:0

x3 = x1.to('cpu')
# x3 device: cpu

x4 = x2.cpu()
# x4 device: cpu

y = torch.tensor([[1, 2, 3], [4, 5, 6]], dtype=torch.float64, device='cuda')
# y device / dtype: cuda:0 torch.float64

x5 = x0.to(y)
# x5 device / dtype: cuda:0 torch.float64
Tensor의 연산은 CPU, GPU에 따라 연산 속도의 차이가 확연하다.
기본적으로, Tensor 객체는 device가 CPU로 할당되어 있다. 이를 GPU로 옮기기 위해서는 torch.cuda()를 가장 많이 사용한다. 이를 다시 CPU로 옮기기 위해서는 torch.cpu()로 할 수 있다.
만약 Tensor 객체 생성 시 CPU로 설정하고 싶으면 device= 를 활용할 수 있다.
def mm_on_cpu(x: Tensor, w: Tensor) -> Tensor:

    y = x.mm(w)
    return y


def mm_on_gpu(x: Tensor, w: Tensor) -> Tensor:

    x_gpu = x.cuda()
    w_gpu = w.cuda()
    y_gpu = x_gpu.mm(w_gpu)
    y = y_gpu.cpu()

    return y
동일한 Matrix 연산을 하는 함수를 CPU, GPU로 각각 수행하도록 구현하였다. GPU를 활용할 경우 먼저 입력 Tensor를 GPU로 옮긴 뒤, torch.mm 연산을 수행한 후 해당 결과를 다시 CPU로 가져오도록 하였다.
x = torch.rand(512, 4096)
w = torch.rand(4096, 4096)

t0 = time.time()
y0 = mytorch.mm_on_cpu(x, w)
t1 = time.time()

y1 = mytorch.mm_on_gpu(x, w)
torch.cuda.synchronize()
t2 = time.time()

print('y1 on CPU:', y1.device == torch.device('cpu'))
diff = (y0 - y1).abs().max().item()
print('Max difference between y0 and y1:', diff)
print('Difference within tolerance:', diff < 5e-2)

cpu_time = 1000.0 * (t1 - t0)
gpu_time = 1000.0 * (t2 - t1)
print('CPU time: %.2f ms' % cpu_time)
print('GPU time: %.2f ms' % gpu_time)
print('GPU speedup: %.2f x' % (cpu_time / gpu_time))
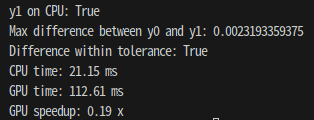
다음과 같이 CPU, GPU 각각의 동작 속도를 확인 해 본 결과 아래와 같다.

성능은 CPU가 훨씬 좋았다. 이는 몇가지 이유가 있는데, CPU에서 GPU로 옮기는 과정에서 더 많은 시간을 잡아먹기 때문에, GPU 기반 연산 결과가 훨씬 더 느릴 수 있다. 이는 소량의 데이터 혹은 작은 연산에서 GPU 연산이 더 비효율적일 수 있다.
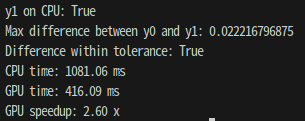
실제로, 입력 Tensor x,w의 Size를 10000x10000으로 변경시킨 후 동일한 계산을 수행 한 결과

약 2.6배 GPU를 활용한 연산이 더 빠름을 확인할 수 있다.
'딥러닝 > Michigan EECS 498' 카테고리의 다른 글
| [EECS 498] Assignment 2. Linear Classifier...(1) (1) | 2024.12.28 |
|---|---|
| [EECS 498] Assignment 1. k-NN...(2) (0) | 2024.12.24 |
| [EECS 498] Assignment 1. k-NN...(1) (1) | 2024.12.24 |
| [EECS 498] Assignment 1. PyTorch 101...(2) (0) | 2024.12.22 |
| [EECS 498] Assignment 1. PyTorch 101...(1) (0) | 2024.12.22 |


